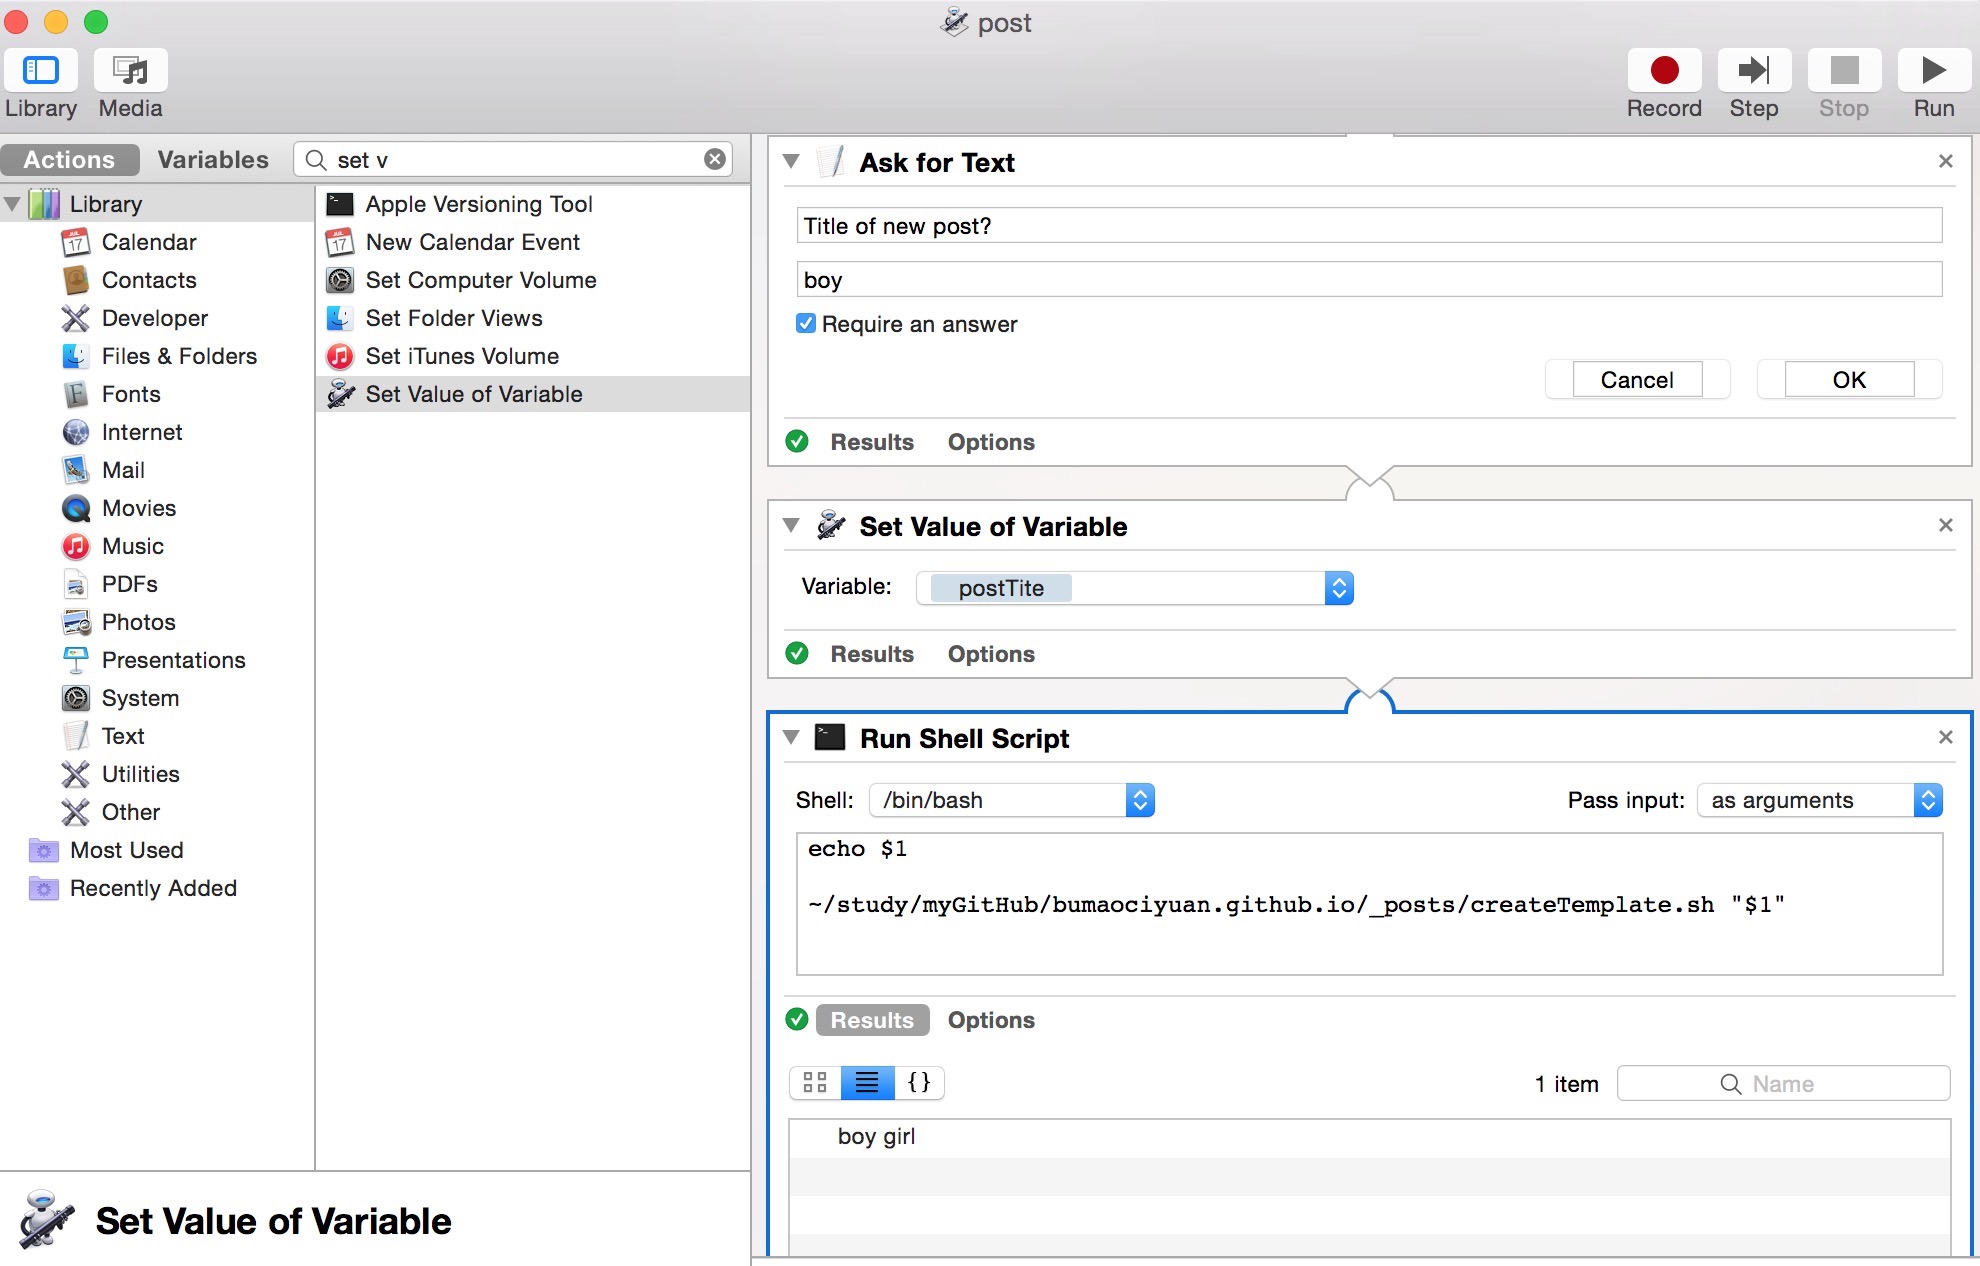
不毛次元2016-09-01T07:33:26.000Zhttp://bumaociyuan.github.io/不毛次元HexoHow to debug node with atomhttp://bumaociyuan.github.io/node/2016/09/02/how-to-debug-node-with-atom.html2016-09-01T19:01:09.000Z2016-09-01T07:33:26.000ZInstall Atom and node-debugger
Use node-debugger:toggle-breakpoint to toggle breakpoint where you want.
Send request on client.
Breakpoint will be trigger.
Use node-debugger:step-next ,node-debugger:start-resume and node-debugger:stop for debug.
Print variable by input js script in debug console.
]]>
<h1 id="Install-Atom-and-node-debugger"><a href="#Install-Atom-and-node-debugger" class="headerlink" title="Install Atom and node-debugger"></a>Install Atom and node-debugger</h1><p><a href="https://atom.io/">Install Atom</a></p>
<figure class="highlight plain"><table><tr><td class="gutter"><pre><div class="line">1</div><div class="line">2</div></pre></td><td class="code"><pre><div class="line"># install node-debugger with apm</div><div class="line">apm i node-debugger</div></pre></td></tr></table></figure>
<h1 id="Config-Project"><a href="#Config-Project" class="headerlink" title="Config Project"></a>Config Project</h1><ol>
<li>Open your node project.</li>
<li>Click <code>Cmd+,</code> open <code>Settings</code>.</li>
<li>Select <code>Packages</code> and open settings of <code>node-debugger</code>.</li>
<li>Config <code>Node Path</code> and <code>Script Main</code>.</li>
</ol>
<h1 id="How-to-debug"><a href="#How-to-debug" class="headerlink" title="How to debug"></a>How to debug</h1>
SwiftLint tutorialhttp://bumaociyuan.github.io/ios/2016/06/21/SwiftLint-tutorial.html2016-06-20T19:31:34.000Z2016-11-15T07:11:47.499ZSwiftLint 是什么?!?!
# git diff --name-only | while read filename; do run_swiftlint "${filename}"; done
# Run for staged
git diff --cached --name-only | while read filename; do run_swiftlint "${filename}"; done
else
echo "${SWIFT_LINT} is not installed."
echo "Plz install swiftlint use brew"
echo "brew install swiftlint"
exit 0
fi
END_DATE=$(date +"%s")
DIFF=$(($END_DATE - $START_DATE))
echo "SwiftLint took $(($DIFF / 60)) minutes and $(($DIFF % 60)) seconds to complete."
生成link
1
ln -s pre-commit.sh .git/hooks/pre-commit
修改权限 -
1
chmod ug+x .git/hooks/pre-commit
修改规则
swiftlint rules 查看所有规则
swiftlint rules rule_name 查看规则详情
在git仓库根目录新建文件 .swiftlint.yml 作用于整个项目
disabled_rules: Disable rules from the default enabled set.
opt_in_rules: Some rules are opt-in.
whitelist_rules: Can not be specified alongside disabled_rules or opt_in_rules. Acts as a whitelist, only the rules specified in this list will be enabled.
官方sample
1
2
3
4
5
6
7
8
9
10
11
12
13
14
15
16
17
18
19
20
21
22
23
24
25
26
27
28
29
30
31
32
33
34
35
36
37
38
39
40
41
42
43
44
45
46
47
48
49
disabled_rules: # rule identifiers to exclude from running
- colon
- comma
- control_statement
opt_in_rules: # some rules are only opt-in
- empty_count
- missing_docs
# Find all the available rules by running:
# swiftlint rules
included: # paths to include during linting. `--path` is ignored if present.
- Source
excluded: # paths to ignore during linting. Takes precedence over `included`.
- Carthage
- Pods
- Source/ExcludedFolder
- Source/ExcludedFile.swift
# configurable rules can be customized from this configuration file
# binary rules can set their severity level
force_cast: warning # implicitly
force_try:
severity: warning # explicitly
# rules that have both warning and error levels, can set just the warning level
# implicitly
line_length: 110
# they can set both implicitly with an array
type_body_length:
- 300 # warning
- 400 # error
# or they can set both explicitly
file_length:
warning: 500
error: 1200
# naming rules can set warnings/errors for min_length and max_length
# additionally they can set excluded names
type_name:
min_length: 4 # only warning
max_length: # warning and error
warning: 40
error: 50
excluded: iPhone # excluded via string
variable_name:
min_length: # only min_length
error: 4 # only error
excluded: # excluded via string array
- id
- URL
- GlobalAPIKey
reporter: "xcode" # reporter type (xcode, json, csv, checkstyle)
]]>
<h1 id="SwiftLint-是什么"><a href="#SwiftLint-是什么" class="headerlink" title="SwiftLint 是什么?!?!"></a>SwiftLint 是什么?!?!</h1><p>A tool to enforce Swift style and conventions, loosely based on <a href="https://github.com/github/swift-style-guide"> GitHub’s Swift Style Guide </a>.</p>
<h2 id="安装"><a href="#安装" class="headerlink" title="安装"></a>安装</h2><p><a href="https://github.com/realm/SwiftLint">GitHub 地址</a></p>
<figure class="highlight plain"><table><tr><td class="gutter"><pre><div class="line">1</div></pre></td><td class="code"><pre><div class="line">$ brew install swiftlint</div></pre></td></tr></table></figure>
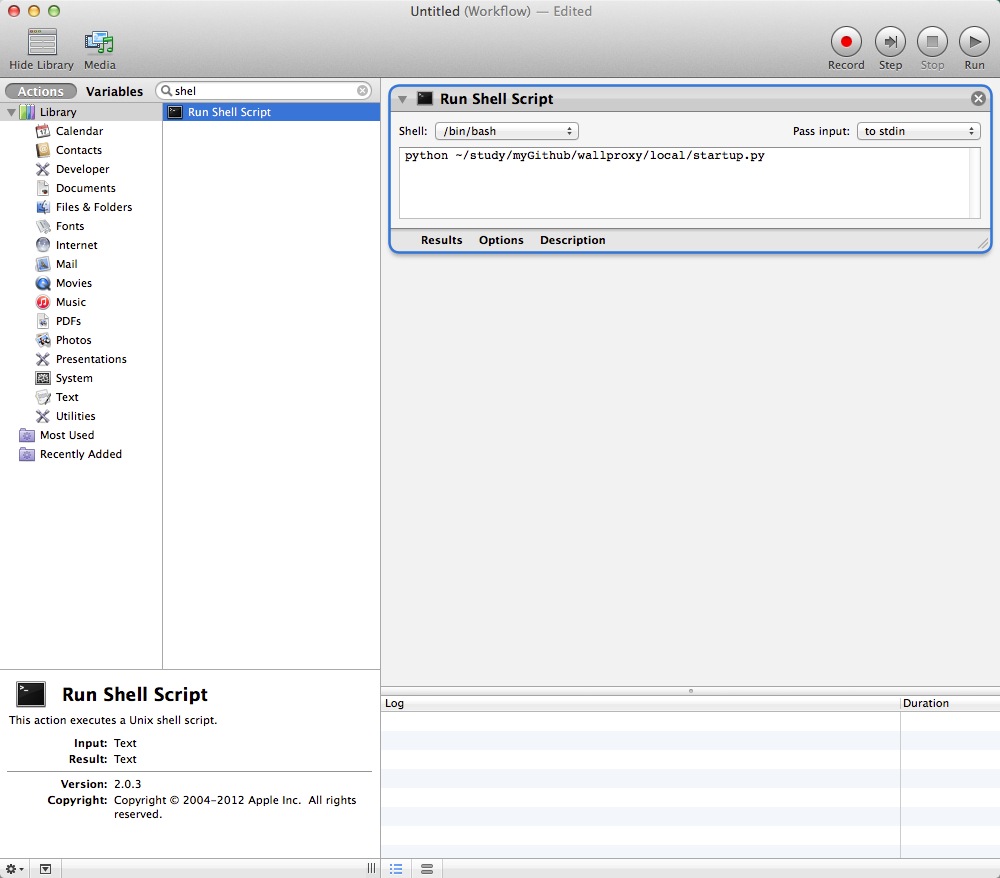
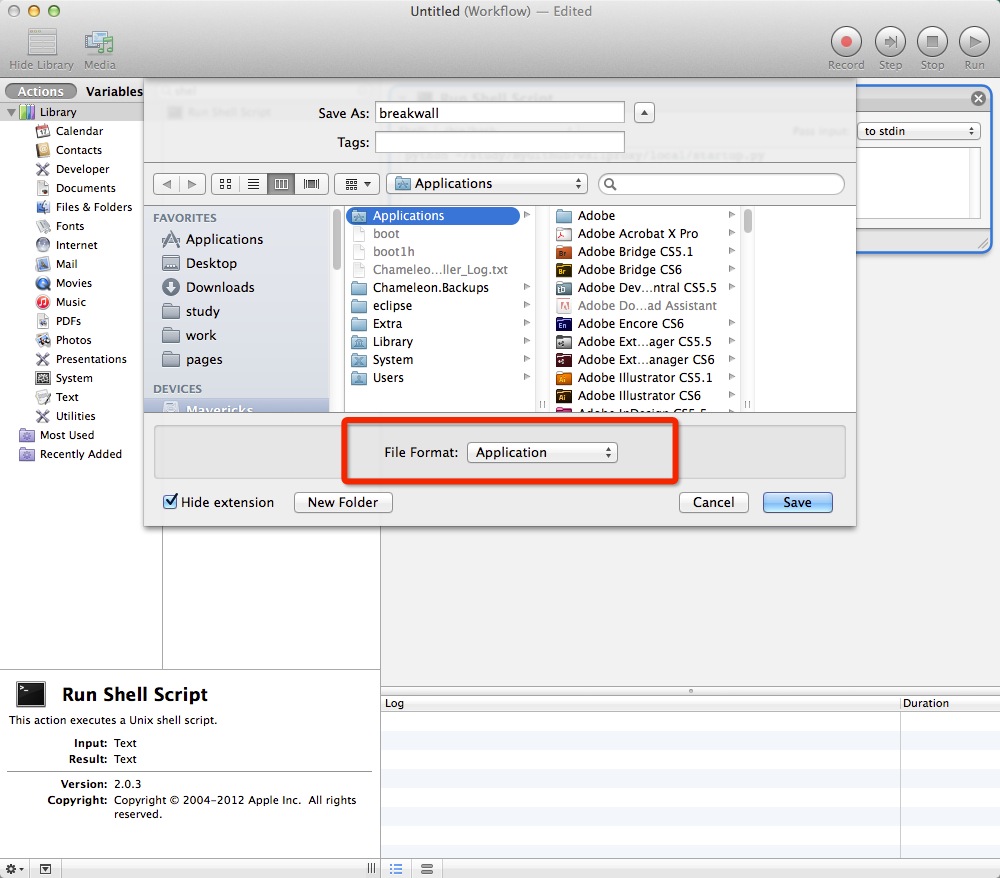
极路由安装shadowsockshttp://bumaociyuan.github.io/breakwall/2016/02/18/gee-router-ss.html2016-02-18T14:35:47.000Z2016-05-10T01:34:24.000Z为了打PS4可以快一点买了个极路由
]]>
<div align="center"><br><img src="http://7xlh4f.com1.z0.glb.clouddn.com/1.png" alt="image"><br></div>
<h1 id="安装-Hexo"><a href="#安装-Hexo" class="headerlink" title="安装 Hexo"></a>安装 Hexo</h1><figure class="highlight plain"><table><tr><td class="gutter"><pre><div class="line">1</div><div class="line">2</div><div class="line">3</div><div class="line">4</div><div class="line">5</div><div class="line">6</div><div class="line">7</div></pre></td><td class="code"><pre><div class="line">$ npm install hexo-cli -g</div><div class="line">$ hexo init blog</div><div class="line">$ cd blog</div><div class="line">$ npm install</div><div class="line">$ cp <md-files> source/_post</div><div class="line">$ hexo server #preview on http://0.0.0.0:4000/</div><div class="line">$ hexo s --debug # s short for server</div></pre></td></tr></table></figure>
<h1 id="安装-NexT-主题"><a href="#安装-NexT-主题" class="headerlink" title="安装 NexT 主题"></a>安装 NexT 主题</h1><p><a href="http://theme-next.iissnan.com/">Docs</a></p>
<figure class="highlight plain"><table><tr><td class="gutter"><pre><div class="line">1</div></pre></td><td class="code"><pre><div class="line">$ git clone git@github.com:iissnan/hexo-theme-next.git themes/next</div></pre></td></tr></table></figure>
make a jxa build system in sublime text 3http://bumaociyuan.github.io/js/2015/09/07/make-a-jxa-build-system-in-sublime-text-3.html2015-09-07T04:00:00.000Z2015-12-09T03:44:17.000ZSUBLIME TEXT HELP » REFERENCE » Build Systems
Tools -> Build System -> New Build System...
1
2
3
{
"cmd": ["osascript","-l","JavaScript","$file"]
}
]]>
<p><a href="http://sublimetext.info/docs/en/reference/build_systems.html">SUBLIME TEXT HELP » REFERENCE » Build Systems</a></p>
<p><code>Tools</code> -> <code>Build System</code> -> <code>New Build System...</code></p>
<figure class="highlight plain"><table><tr><td class="gutter"><pre><div class="line">1</div><div class="line">2</div><div class="line">3</div></pre></td><td class="code"><pre><div class="line">{</div><div class="line"> "cmd": ["osascript","-l","JavaScript","$file"]</div><div class="line">}</div></pre></td></tr></table></figure>
alfred run a jxa scripthttp://bumaociyuan.github.io/js/2015/09/07/alfred-run-a-jxa-script.html2015-09-07T04:00:00.000Z2015-12-09T03:44:17.000ZAdd a bash script
1
2
3
4
5
6
7
8
osascript -l JavaScript <<"EOF"
var app = Application('Finder')
app.activate()
app.includeStandardAdditions = true
app.displayAlert('wow')
FOE
Nice
Alfred v2.8
21st Sep 2015
•JavaScript is now available as a scripting language within Alfred Workflows (OS X 10.10+, using osascript)
]]>
<p>Add a bash script</p>
<figure class="highlight plain"><table><tr><td class="gutter"><pre><div class="line">1</div><div class="line">2</div><div class="line">3</div><div class="line">4</div><div class="line">5</div><div class="line">6</div><div class="line">7</div><div class="line">8</div></pre></td><td class="code"><pre><div class="line">osascript -l JavaScript <<"EOF"</div><div class="line"></div><div class="line">var app = Application('Finder')</div><div class="line">app.activate()</div><div class="line">app.includeStandardAdditions = true</div><div class="line">app.displayAlert('wow')</div><div class="line"></div><div class="line">FOE</div></pre></td></tr></table></figure>
remote control mac on mac os 10.10http://bumaociyuan.github.io//2015/09/02/remote-control-mac-on-mac-os-1010.html2015-09-02T04:00:00.000Z2015-12-09T03:44:17.000ZOS X Mavericks: Share your screen using Back to My Mac
Follow these steps for each computer whose screen you want to share.
Choose Apple menu > System Preferences, then click Sharing.
Select Screen Sharing. If Remote Management is selected, you must deselect it before you can select Screen Sharing.
Next to “Allow access for,” choose all users, or only listed users. If you permit only listed users to have access to the screen, click Add (+) and Remove (-) to edit the list.
In System Preferences, click Show All, then open iCloud preferences.
If you aren’t already signed in to iCloud, enter the Apple ID you use with iCloud, then click Sign In.
Select Back to My Mac. To stop sharing your screen using Back to My Mac, open iCloud preferences, then deselect Back to My Mac.
]]>
<p><a href="https://support.apple.com/kb/PH14179?locale=en_US">OS X Mavericks: Share your screen using Back to My Mac</a></p>
<p>Follow these steps for each computer whose screen you want to share.</p>
<ol>
<li>Choose Apple menu > System Preferences, then click Sharing.</li>
<li>Select Screen Sharing.<br>If Remote Management is selected, you must deselect it before you can select Screen Sharing.</li>
<li>Next to “Allow access for,” choose all users, or only listed users. If you permit only listed users to have access to the screen, click Add (+) and Remove (-) to edit the list.</li>
<li>In System Preferences, click Show All, then open iCloud preferences.</li>
<li>If you aren’t already signed in to iCloud, enter the Apple ID you use with iCloud, then click Sign In.</li>
<li>Select Back to My Mac.<br>To stop sharing your screen using Back to My Mac, open iCloud preferences, then deselect Back to My Mac.</li>
</ol>
play ps game on mac with openemuhttp://bumaociyuan.github.io/game/2015/09/01/play-ps-game-on-mac-with-openemu.html2015-09-01T04:00:00.000Z2015-12-09T03:44:17.000Z
]]>
<div align="center"><br><iframe width="560" height="315" src="https://www.youtube.com/embed/6z2Aa3lrDmM" frameborder="0" allowfullscreen></iframe><br></div>
open application in terminalhttp://bumaociyuan.github.io/terminal/2015/08/17/open-application-in-terminal.html2015-08-17T04:00:00.000Z2015-12-09T03:44:17.000ZI found solution of open sublime in terminal, but how can I open others app in terminal ?
##Copy following lines into ~/.bashrc or ~/.zshrc
1
2
3
4
5
6
7
8
9
10
11
12
13
14
15
# -------
# Function
# -------
function google() { open "https://www.google.com/search?q=$*&gws_rd=ssl"; }
function baidu() { open "https://www.baidu.com/s?ie=UTF-8&wd=$*"; }
function github() { open "https://github.com/search?utf8=%E2%9C%93&q=$*"; }
# -------
# Aliases
# -------
alias chrome='open -a /Applications/Google\ Chrome.app'
alias sublime='open -a /Applications/Sublime\ Text\ 3.app'
alias xcode='open -a /Applications/Xcode.app'
alias mou='open -a /Applications/Mou.app'
...and so on
##Make sure ~/bash_profile contains following line
]]>
<p>I found solution of <a href="http://bumaociyuan.github.io/mac/2015/08/10/open-sublime-in-terminal.html">open sublime in terminal</a>, but
oh my zsh update failedhttp://bumaociyuan.github.io/terminal/2015/08/14/oh-my-zsh-update-failed.html2015-08-14T04:00:00.000Z2015-12-09T03:44:17.000ZError message like :
1
2
blabla https://...... certificate .... fail
:D
##Solution
1
2
3
4
$ vim $ZSH/.git/config
#replace origin url with 'git@github.com:robbyrussell/oh-my-zsh.git'
$ upgrade_oh_my_zsh
]]>
<p>Error message like :</p>
<figure class="highlight plain"><table><tr><td class="gutter"><pre><div class="line">1</div><div class="line">2<
open sublime in terminalhttp://bumaociyuan.github.io/mac/2015/08/10/open-sublime-in-terminal.html2015-08-10T04:00:00.000Z2015-12-09T03:44:17.000Z
]]>
<figure class="highlight plain"><table><tr><td class="gutter"><pre><div class="line">1</div></pre></td><td class="code"><pre><div class="lin
using shadowsocks in terminalhttp://bumaociyuan.github.io/breakwall/2015/08/10/using-shadowsocks-in-terminal.html2015-08-10T04:00:00.000Z2015-12-09T03:44:17.000ZUsing Shadowsocks with Command Line Tools
##youtube-dl supported site https://github.com/rg3/youtube-dl/blob/master/docs/supportedsites.md :D
]]>
<p><a href="https://github.com/shadowsocks/shadowsocks/wiki/Using-Shadowsocks-with-Command-Line-Tools" target="_blank" rel="external">Using
share internet connection from mac to mobile devicehttp://bumaociyuan.github.io/mac/2015/08/08/share-internet-connection-from-mac-to-mobile-device.html2015-08-08T04:00:00.000Z2015-12-09T03:44:17.000ZReverse Tether - Share OSX Yosemite Wifi Connection Over Bluetooth
In order to do this in Yosemite, you’ll need to go back to the main screen of System Preferences and click on the Sharing preference pane. In the sidebar, there will be an Internet Sharing option. Click on this to view its settings.
Now set the “Share your connection from” drop down to Wi-Fi and then check the Bluetooth PAN checkbox in the menu below. Next just make sure to check the box next Internet Sharing in the sidebar.
Once this is done your Mac should be sharing its Wi-Fi connection to devices in your Bluetooth PAN.
]]>
<p><a href="http://apple.stackexchange.com/questions/180578/reverse-tether-share-osx-yosemite-wifi-connection-over-bluetooth" target="_blank
self signed certificates in iOShttp://bumaociyuan.github.io/ios/2015/07/17/self-signed-certificates-in-ios.html2015-07-17T04:00:00.000Z2016-02-17T03:07:38.000ZFive Tips for Using Self Signed SSL Certificates with iOS Create a HTTPS Server to install ipa locally
]]>
<p>27岁生日前一天,入手了正版reveal<br>装了 reveal loader没的反应<br>看了<a href="http://c.blog.sina.com.cn/profile.php?blogid=cb8a22ea89000gtw" target="_blank"
install java 7http://bumaociyuan.github.io/java/2015/05/28/install-java-7.html2015-05-28T04:00:00.000Z2015-12-09T03:44:17.000ZInstalled Java 7 on Mac OS X but Terminal is still using version 6
]]>
<p><a href="http://stackoverflow.com/questions/12757558/installed-java-7-on-mac-os-x-but-terminal-is-still-using-version-6" target="_blank"
reindex spotlighthttp://bumaociyuan.github.io/mac/2015/05/26/reindex-spotlight.html2015-05-26T04:00:00.000Z2015-12-09T03:44:17.000ZSpotlight reports “Indexing and searching disabled” in Lion
1
2
3
4
sudo mdutil -i off /
sudo rm -rf /.Spotlight*
sudo mdutil -i on /
sudo mdutil -E /
]]>
<p><a href="http://apple.stackexchange.com/questions/24401/spotlight-reports-indexing-and-searching-disabled-in-lion" target="_blank" rel="e
install meld on machttp://bumaociyuan.github.io//2015/05/17/install-meld-on-mac.html2015-05-17T04:00:00.000Z2015-12-09T03:44:17.000Zgist
utf8_to_b64('✓ à la mode'); // "4pyTIMOgIGxhIG1vZGU="
b64_to_utf8('4pyTIMOgIGxhIG1vZGU='); // "✓ à la mode"
]]>
<p><a href="https://developer.mozilla.org/en-US/docs/Web/API/WindowBase64/Base64_encoding_and_decoding" target="_blank" rel="external">Base6
How to change status bar colorhttp://bumaociyuan.github.io/ios/2015/05/04/how-to-change-status-bar-color.html2015-05-04T04:00:00.000Z2015-12-09T03:44:17.000ZHow to change Status Bar text color in iOS 7
Set the UIViewControllerBasedStatusBarAppearance to YES in the .plist file.
In the viewDidLoad do a [self setNeedsStatusBarAppearanceUpdate];
Add the following method:
1
2
3
-(UIStatusBarStyle)preferredStatusBarStyle{
return UIStatusBarStyleLightContent;
}
This will not work controllers inside UINavigationController
The UINavigationController does not forward on preferredStatusBarStyle calls to its child view controllers. Instead it manages its own state - as it should, it is drawing at the top of the screen where the status bar lives and so should be responsible for it. Therefor implementing preferredStatusBarStyle in your VCs within a nav controller will do nothing - they will never be called.
The trick is what the UINavigationController uses to decide what to return for UIStatusBarStyleDefault or UIStatusBarStyleLightContent. It bases this on it’s UINavigationBar.barStyle. The default (UIBarStyleDefault) results in the dark foreground UIStatusBarStyleDefault status bar. And UIBarStyleBlack will give a UIStatusBarStyleLightContent status bar.
If you want UIStatusBarStyleLightContent on a UINavigationController use:
]]>
<blockquote>
<p>In 1x place image with resolution 320 x 480. </p>
<p>In 2x place image with resolution 640 x 960. </p>
<p>In Retina 4 2x pla
change web safari inspector font sizehttp://bumaociyuan.github.io/web/2015/04/21/change-safari-web-inspector-font.html2015-04-21T04:00:00.000Z2015-12-09T03:44:17.000Zhttps://gist.github.com/chrisphenry/8949607
]]>
<p><a href="https://gist.github.com/chrisphenry/8949607" target="_blank" rel="external">https://gist.github.com/chrisphenry/8949607</a></p>
shell note 2 codinghttp://bumaociyuan.github.io//2015/04/16/shell-note-2-coding-basic.html2015-04-16T04:00:00.000Z2015-12-09T03:44:17.000Z#search file in dir
]]>
<p>#search file in dir</p>
<figure class="highlight plain"><table><tr><td class="gutter"><pre><div class="line">1</div><div class="line">2</
ios dev black magichttp://bumaociyuan.github.io/ios/2015/04/12/ios-dev-black-magic.html2015-04-12T04:00:00.000Z2015-12-09T03:44:17.000Z#Macro
1
2
#define kBaseURL @"http://domain.com"
#define kActionURL kBaseURL @"/api/action"
#Source Control
Find out who commit the bug code .
Just right click on the line and click on “Show Blame for Line”
build target, in Edit Scheme...Build tab if there are multiple targets, remove useless targets with unchecking all checkboxes and delete them
Build Setting change Product Name from xxx copy to newName
#Info.plist rename info.plist ,in Build SettingsGeneral tag select new plist file
#Preprocessor Select “Awesome Lite” target > Build Settings > Preprocessing > Preprocessor Macros > Add TARGET_LITE to each of the configuration (eg both Debug and Release configurations).
1
2
3
4
5
#if defined(TARGET_LITE)
NSLog(@"Lite version");
#else
NSLog(@"Original version");
#endif
#Resources, Images and Assets Catalog Select the resource > File Inspector > Target Membership > check the targets intended.
]]>
<p><a href="http://samwize.com/2014/05/22/create-multiple-targets-slash-apps-for-1-xcode-project/" target="_blank" rel="external">link</a><b
swift lazy initializationhttp://bumaociyuan.github.io/ios/2015/03/06/swift-lazy-initialization.html2015-03-06T05:00:00.000Z2015-12-16T03:02:39.000Z
]]>
<p><a href="https://developer.apple.com/library/prerelease/ios/documentation/UIKit/Reference/UIMutableUserNotificationCategory_class/index.h
use app icons and launch images in codehttp://bumaociyuan.github.io/ios/2015/02/06/use-app-icons-and-launch-images-in-code.html2015-02-06T05:00:00.000Z2015-12-09T03:44:17.000ZiOS 7 App Icons, Launch images And Naming Convention While Keeping iOS 6 Icons
]]>
<figure class="highlight objc"><table><tr><td class="gutter"><pre><div class="line">1</div><div class="line">2</div><div class="line">3</div
xcode only ios device no simulatorhttp://bumaociyuan.github.io/xcode/2015/01/30/xcode-only-ios-device-no-simulator.html2015-01-30T05:00:00.000Z2015-12-09T03:44:17.000Zxcode only ios device no simulator
iOS Simulator -> Hardware -> Device -> Manage Devices... click plus button at bottom , create simulators
]]>
<p>xcode only ios device no simulator</p>
<p><a href="http://www.reddit.com/r/iOSProgramming/comments/2b9j2p/xcode_6_missing_ios_8_simulator
Mac mini upgrade ssd and memoryhttp://bumaociyuan.github.io/mac/2015/01/29/mac-mini-upgrade-ssd-and-memory.html2015-01-29T05:00:00.000Z2015-12-09T03:44:17.000Z购买配件:
]]>
<p><a href="https://help.github.com/articles/caching-your-github-password-in-git/" target="_blank" rel="external">https://help.github.com/ar
Use the Purchases page to try againhttp://bumaociyuan.github.io/mac/2015/01/13/use-the-purchases-page-to-try-again.html2015-01-13T05:00:00.000Z2015-12-09T03:44:17.000ZMac OS X 10.9 中 app store下载应用出现use the purchases page to try again
1
2
open $TMPDIR../C/;sudo rm -r com.apple.appstore
]]>
<p><a href="http://liyunpeng.iteye.com/blog/1999174" target="_blank" rel="external">Mac OS X 10.9 中 app store下载应用出现use the purchases page to
D U N S Profile Lookuphttp://bumaociyuan.github.io/ios/2015/01/12/d-u-n-s-profile-lookup.html2015-01-12T05:00:00.000Z2015-12-09T03:44:17.000ZD-U-N-S Profile Lookup
]]>
<p><a href="https://developer.apple.com/ios/enroll/dunsLookupForm.action" target="_blank" rel="external">D-U-N-S Profile Lookup</a></p>
<p><
Scroll view autolayout demohttp://bumaociyuan.github.io/ios/2015/01/09/scroll-view-autolayout-demo.html2015-01-09T05:00:00.000Z2015-12-09T03:44:17.000ZscrollViewAutoLayoutDemo
]]>
<p><a href="https://github.com/bumaociyuan/scrollViewAutoLayoutDemo" target="_blank" rel="external">scrollViewAutoLayoutDemo</a></p>
zsh number pad not workinghttp://bumaociyuan.github.io/terminal/2015/01/01/zsh-number-pad-not-working.html2014-12-31T21:57:03.000Z2015-12-09T03:44:17.000Zoh-my-zsh issue 2654
@tomduncalf’s answer
1
I found a fix for this issue over at the iTerm 2 issue tracker: https://code.google.com/p/iterm2/issues/detail?id=2000 - basically, go to Preferences -> Profile -> Keys and load the "xterm with numeric keypad" preset. Not sure why this isn't the default!
]]>
<p><a href="https://github.com/robbyrussell/oh-my-zsh/issues/2654" target="_blank" rel="external">oh-my-zsh issue 2654</a></p>
<p>@tomduncal
cocoapods empty reply form serverhttp://bumaociyuan.github.io/ios/2014/12/04/cocoapods-empty-reply-form-server.html2014-12-03T17:38:41.000Z2015-12-09T03:44:17.000ZWhen run pod install
#Please restart terminal(s) before running autojump.
]]>
<h1 id="4th-7-2015"><a href="#4th-7-2015" class="headerlink" title="4th/7/2015"></a>4th/7/2015</h1><p>To hide username@computername both in
tfs via githttp://bumaociyuan.github.io/git/2014/11/26/tfs-via-git.html2014-11-26T14:09:19.000Z2015-12-09T03:44:17.000ZMac下配置Git-TF来连接TFS2012
[!] The use of implicit sources has been deprecated. To continue using all of the sources currently on your machine, add the following to the top of your Podfile:
source 'https://github.com/CocoaPods/Specs.git'
[!] The `abc [Debug]` target overrides the `OTHER_LDFLAGS` build setting defined in `Pods/Target Support Files/Pods/Pods.debug.xcconfig'. This can lead to problems with the CocoaPods installation
- Use the `$(inherited)` flag, or
- Remove the build settings from the target.
[!] The `abc [Release]` target overrides the `OTHER_LDFLAGS` build setting defined in `Pods/Target Support Files/Pods/Pods.release.xcconfig'. This can lead to problems with the CocoaPods installation
- Use the `$(inherited)` flag, or
- Remove the build settings from the target.
Build project get error below
1
2
3
Undefined symbol for architecture “_OBJC_CLASS_$_AFHTTPClient”
]]>
<p><a href="http://stackoverflow.com/questions/10335747/how-to-download-xcode-4-5-6-and-get-the-dmg-file" target="_blank" rel="external">How
git note 2http://bumaociyuan.github.io/git/2014/11/23/git-note-2.html2014-11-23T02:56:19.000Z2016-06-22T03:27:13.000ZHow To Set Up Automatic Deployment with Git with a VPS
$git log --online -6
XXXXXXX modify hello.h                        # F    XXXXXXX add hello.h                            # E
XXXXXXX ignore object files                    # D
XXXXXXX move .file outside also works.        # C
XXXXXXX Hello world initialized                # B
XXXXXXX README is frome welcome.txt        # A
坏蛋: 提交 D。
目的就是:干掉提交D 需要拣选指令–git cherry-pick 含义是从众多的提交中挑选出一个提交应用在当前的工作分支中。该命令需要提供一个提交ID作为参数,操作过程相当于讲该提交到出为补丁文件,然后在当前HEAD上重放,形成无论内容还是提交说明都一致的提提交 首先对版本库要‘参演’的角色进行标记,使用git tag 命令
git tag F
git tag E HEAD^
git tag D HEAD^^
git tag C HEAD^^^
git tag B HEAD^4
git tag A HEAD^5
1.第一幕干掉坏蛋 D (1) 执行 git checkout ,暂时将 HEAD 头指针切换到 C。 切换过程显示非跟踪状态的警告,没有关系,因为剧情需要。
$git checkout C
$git checkout -b new_branch_name
(2) 执行拣选操作将 E 提交在
change some history comment
git rebase -i <commit number>
change last comment
git commit --amend
安装自动补全命令
brew install bash-completion
.gitignore
# 这是注释行 -- 被忽略
*.a         # 忽略所有以 .a 为扩展名的文件。
!lib.a        # 但是 lib.a 文件或者目录不要忽略,即使前面设置了对 *.a 的忽略。
/TODO         # 只忽略此目录下的 TODO 文件,子目录的 TODO 文件不忽略。
build/      # 忽略所有 build/ 目录下的文件
doc/*.txt     # 忽略文件如 doc/notes.txt,但是文件如 doc/server/arch.txt 不被忽略。

“# a comment - this is ignored
# no .a files
*.a
# but do track lib.a, even though you're ignoring .a files above
!lib.a
# only ignore the root TODO file, not subdir/TODO
/TODO
# ignore all files in the build/ directory
build/
# ignore doc/notes.txt, but not doc/server/arch.txt
doc/*.txt
# ignore all .txt files in the doc/ directory
doc/**/*.txt”
remove ignored files
1
2
3
git rm -r --cached .
git add .
git commit -am "Remove ignored files"
git rev-list HEAD | wc -l
git rev-list HEAD | wc -l # 查看历史提交次数
git diff
git diff B A             # 比较里程碑 B 和里程碑 A
git diff A                # 比较工作区和里程碑 A
git diff --cached A     # 比较暂存区和里程碑 A
git diff --cached        # 比较工作区和暂存区
git diff HEAD             # 比较工作区和HEAD

若只有一个参数就是比较工作区和 这个参数
两个参数就是比较两个参数
参数可以是 里程碑 commitId 工作区 等等

git diff <commit1> <commit2> -- <paths>
git blame
git blame <file path> # 文件追溯
]]>
<p><strong>How To Set Up Automatic Deployment with Git with a VPS</strong></p>
<figure class="highlight plain"><table><tr><td class="gutter"
svn via githttp://bumaociyuan.github.io/git/2014/11/21/svn-via-git.html2014-11-20T22:40:16.000Z2015-12-09T03:44:17.000Zgit-svn 简单教程
]]>
<p>You can cancel animation by subclassing UISearchDisplayController and adding this:</p>
<figure class="highlight plain"><table><tr><td cla
customize tabbar icon and text colorhttp://bumaociyuan.github.io/ios/2014/10/31/customize-tabbar-icon-and-text-color.html2014-10-30T19:41:32.000Z2015-12-09T03:44:17.000Z
]]>
<p><a href="https://developer.apple.com/library/ios/qa/qa1633/_index.html" target="_blank" rel="external">link</a></p>
<p>##Company Name</p>
run shell script by double clickhttp://bumaociyuan.github.io/terminal/2014/10/17/run-shell-script-by-double-click.html2014-10-16T18:38:50.000Z2015-12-09T03:44:17.000Zfile name as auto_synch_this_path.command
UncrustifyX allows importing and exporting of Uncrustify .cfg files, and provides a GUI to run a configuration set on a list of files, or direct source code input.
Where 3600 is the number of seconds in one hour. You may modify it to any number of seconds, or alternatively just enter caffeinate without a timer to disable sleep mode until that terminal window is closed.
use the cmd pod trunk push NSString-BlockHelper.podspec --verbose to push .podspec to repo
]]>
<p>—2015.08.02—</p>
<p><strong>error</strong><code>- ERROR | [watchOS] Returned an unsuccessful exit code.</code> blabla</p>
<p>add flowing
Disable UISearchBar begin editing animationhttp://bumaociyuan.github.io/ios/2014/08/28/disable-uisearchbar-begin-editing-animation.html2014-08-28T13:24:00.000Z2015-12-09T03:44:17.000Z
Do not use searchBar as tableHeaderView
That’s all.
]]>
<ol>
<li>Do not use searchBar as tableHeaderView</li>
<li>That’s all.</li>
</ol>
Enable php on machttp://bumaociyuan.github.io/ios/2014/08/25/enable-php-on-mac.html2014-08-25T01:07:00.000Z2015-12-09T03:44:17.000Zlink
Navigate to /etc/apache2
Do a search for “php”. You should see the following line:#LoadModule php5_module libexec/apache2/libphp5.soRemove the “#”
Save the file. You may need to authenticate upon saving.
run sudo apachectl restart to restart apache
visit localhost you will see It works!
/etc/apache2/httpd.confSearch for “virtual” in your text editor. You should see the following lines:
1
2
#Virtual hosts
#Include /private/etc/apache2/ extra/httpd-
Uncomment the second line that starts with “#Include” by removing the “#”. We now need to modify httpd-vhosts.conf file to add our virtual hosts.
XAMPP: Starting ProFTPD.../Applications/XAMPP/xamppfiles/xampp: line 184: /Applications/XAMPP/xamppfiles//var/proftpd/start.err: No such file or directory fail.
Contents of "/Applications/XAMPP/xamppfiles//var/proftpd/start.err": cat: /Applications/XAMPP/xamppfiles//var/proftpd/start.err: No such file or directory
]]>
<p>error :</p>
<p><code>Request failed: unacceptable content-type: text/html</code></p>
<p>or</p>
<p><code>The operation couldn’t be complet
baidu map issueshttp://bumaociyuan.github.io/ios/2014/08/12/baidu-map-issue.html2014-08-12T13:58:00.000Z2015-12-09T03:44:17.000Z关于百度地图IOS API 2.3.0 不显示地图的解决方法。
在AppDelegate里面init BMapManager以后。 设为属性 不然会出各种问题
]]>
<p>关于百度地图IOS API 2.3.0 不显示地图的解决方法。</p>
<p>在AppDelegate里面init BMapManager以后。<br>设为属性<br>不然会出各种问题</p>
navigation bar customize back buttonhttp://bumaociyuan.github.io/ios/2014/08/08/navigation-bar-customize-back-button.html2014-08-08T15:09:00.000Z2015-12-09T03:44:17.000ZJuly 21, 2015 iOS开发的一些奇巧淫技
]]>
<figure class="highlight plain"><table><tr><td class="gutter"><pre><div class="line">1</div></pre></td><td class="code"><pre><div class="lin
ios webview block detect iphone numberhttp://bumaociyuan.github.io/ios/2014/07/29/ios-webview-block-detect-iphone-number.html2014-07-29T15:25:00.000Z2015-12-09T03:44:17.000Zadd this in html head tag
]]>
<p>add this in html head tag</p>
<figure class="highlight plain"><table><tr><td class="gutter"><pre><div class="line">1</div></pre></td><td
group style tableview background color in ios 7http://bumaociyuan.github.io/ios/2014/07/26/group-style-tableview-background-color-in-ios-7.html2014-07-25T21:14:00.000Z2015-12-09T03:44:17.000Z#get color with
]]>
<p>主要是实现以下几个方法</p>
<figure class="highlight plain"><table><tr><td class="gutter"><pre><div class="line">1</div><div class="line">2</div><div
hahahttp://bumaociyuan.github.io/other/2014/07/23/haha.html2014-07-22T23:39:50.000Z2015-12-09T03:44:17.000Z今天macbook pro 到了 心情大好 发个blog 纪念一哈 屌丝的电脑 哈哈哈
]]>
<p>今天macbook pro 到了 心情大好<br>发个blog 纪念一哈<br>屌丝的电脑<br>哈哈哈</p>
github fork a repo branchhttp://bumaociyuan.github.io/git/2014/06/26/github-fork-a-repo-branch.html2014-06-26T13:23:50.000Z2015-12-09T03:44:17.000Zlink I don’t know a native way yet, but you can do it following this recipe:
Fork the repository in question (called ‘upstream’) on the GitHub website to your workspace there.
Run the GitHub desktop application and clone the repository onto your PC.
Use the GitHub desktop application to open a shell in the repository. (The git commands are not available from the default PowerShell unless you configure that manually.)
Once more, publish your repo using the GitHub desktop application.
On the GitHub website, open your repository and click ‘settings’.
Change the “Default branch” back to the (new) ‘master’ branch.
Go back to your repository, go to the ‘branches’ tab, now you can delete the “temporary” branch.
This should be what you were looking for. Perhaps GitHub will provide a more convenient way to do this in future (e.g., clicking “Fork” from a project’s branch results in exactly this behaviour).
]]>
<p><a href="http://stackoverflow.com/questions/9227873/fork-from-a-branch-in-github" target="_blank" rel="external">link</a><br>I don’t know
git on google drivehttp://bumaociyuan.github.io/git/2014/06/25/git-on-google-drive.html2014-06-25T14:51:50.000Z2015-12-09T03:44:17.000Zlink
Now, create a folder in your Google Drive folder called “git”. You want this folder as git produces a lot of files and you may want other stuff on your google drive besides your code repository.
1
mkdir \Users\JoeUser\Google Drive\git
CD yourself to your project folder (or whatever folder you want to have git control over).
1
cd \my-project-path
Now, in the projects folder, perform the following git commands
1
2
3
git init
git add .
git commit -m "first commit"
Now we go to Google Drive and create a bare git repo (note that the backslash between Google and Drive should be exactly there)
Xcode > Preferences > Accounts > View Details > And just refresh the Provisioning Profile
Command /Applications/Xcode.app/Contents/Developer/Toolchains/XcodeDefault.xctoolchain/usr/bin/clang failed with exit code 1
将Apple LLVM compiler 4.2 - Language ->c++ Standard Library 修改为 libstdc++ (GNU C++ standard library)
Could not change executable permissions on the application.
Delete the app, restart iPhone
]]>
<hr>
<p>February 4, 2015</p>
<p><strong>Showing first 200 notices only</strong><br>静态库重复</p>
<hr>
<p><strong>Mach O Link Error- linker comma
google addresseshttp://bumaociyuan.github.io/breakwall/2014/06/18/google-addresses.html2014-06-18T15:06:50.000Z2015-12-09T03:44:17.000Z—2014.10.23—
git tag                                 #查看所有标签
git tag v0.1.2-light                    #创建轻量标签
git tag -a v0.1.2 -m “0.1.2版本”        #创建附注标签

git checkout tag-name
git tag -d v0.1.2                     #删除标签
git tag -a v0.1.1 9fbc3d0             #补打标签

git push --tags
<!-- required. the title to display during the download. -->
<key>title</key>
<string>Example Corporate App</string>
</dict>
</dict>
</array>
</dict>
</plist>
需要配置的 字段
bundle-identifier ==> bundle identifier
bundle-version ==> bundle version
title ==> 安装的时候显示的title
software-package ==> ipa url #必须
display-image ==> 144 * 144 icon url
full-size-image ==> 512 * 512 icon url
]]>
<p>Ad hoc 是苹果的内测机制,可以给所有注册的device 安装内测ipa。</p>
<ul>
<li>首先申请ad hoc 证书</li>
<li>在dev center 加入设备udid</li>
<li>设备下载 mobleprovision文件</li>
<li>
vb based browserhttp://bumaociyuan.github.io/vb/2013/12/10/vb-based-browser.html2013-12-09T21:06:50.000Z2015-12-09T03:44:17.000Z参考视频教学 youtube
Imports Skybound.Gecko
Public Class FasterBrowser
    Inherits GeckoWebBrowser
End Class
2,在ui 上加入 new class
3,
Imports Skybound.Gecko

Public Class Form1

    Sub New()
        InitializeComponent()

        Xpcom.Initialize(Environment.CurrentDirectory + "lrunner")


    End Sub

    Private Sub Button1_Click(ByVal sender As System.Object, ByVal e As System.EventArgs) Handles Button1.Click
        FasterBrowser1.Navigate("http://www.zmaitech.com")
    End Sub

End Class
pod install --verbose --no-repo-update
pod update --verbose --no-repo-update
]]>
<p>references: <a href="http://www.raywenderlich.com/12139/introduction-to-cocoapods" target="_blank" rel="external">raywenderlich</a></p>
<
xcode find and replace with regexhttp://bumaociyuan.github.io/ios/2013/10/12/2013-10-1-xcode-find-replace-with-regex.html2013-10-11T20:06:50.000Z2015-12-09T03:44:17.000Z##update July 6, 2015 replace code with Automator Editing text in Automator
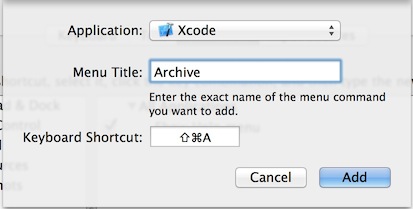
Add shortcut for services Keyboard -> Shortcuts -> Services -> The new Service add shortcut in Xcode many shortcuts not working cmd+shift+X works well
]]>
<p>##update July 6, 2015<br>replace code with Automator<br><a href="http://stackoverflow.com/questions/13495102/editing-text-in-automator" t
iOS Icon 尺寸http://bumaociyuan.github.io/ios/2013/09/19/iconSize.html2013-09-18T20:06:50.000Z2015-12-09T03:44:17.000Zios-icon-generator-scripts


 ]]>
]]>